'리눅스'에 해당되는 글 163건
- 2008.11.17 하나의 물리적 NIC에 복수개의 인터페이스 설정하기
- 2008.11.17 VirtualBox on Linux 에서 usbfs 인식시키기
- 2008.09.24 vmware 마우스 휠 살리기
- 2008.09.01 Nemiver - gnome 환경에서의 gdb 디버거
- 2008.08.20 Xming 사용법
- 2008.08.06 삼바 옵션 - usershare
- 2008.08.04 vmware-tools 모듈 컴파일 시 에러 생길 때 해결 법 - vmware on the windows(guest linux) 2
- 2008.03.28 Vim Tip
- 2007.11.29 [ubuntu] VFAT 파티션 부팅과 동시에 마운트 하기
- 2007.11.29 [ubuntu] MS IntelliMouse 3.0 버튼 설정하기
하나의 물리적 NIC에 복수개의 인터페이스 설정하기
iface eth0 inet static
address 192.168.0.70
netmask 255.255.255.0
broadcast 192.168.0.255
gateway 192.168.0.1
metric 0
iface eth0:1 inet static
address 192.168.123.70
netmask 255.255.255.0
network 192.168.123.0
위와 같이 설정 후
# ifup eth0
해 주면 eth0에 관련된 인터페이스들을 띄울 수 있다.
'리눅스' 카테고리의 다른 글
| PulseAudio 설치하기 (0) | 2008.11.20 |
|---|---|
| Amarok Full Screen - Amarok (0) | 2008.11.20 |
| VirtualBox on Linux 에서 usbfs 인식시키기 (0) | 2008.11.17 |
| vmware 마우스 휠 살리기 (0) | 2008.09.24 |
| Nemiver - gnome 환경에서의 gdb 디버거 (0) | 2008.09.01 |
VirtualBox on Linux 에서 usbfs 인식시키기
방법은 간단!
/etc/fstab에 아래 내용을 추가해 주고 재부팅 해주믄 된다.
여기서 devgid=125는 vboxusers의 groud id을 넣어주면 된다.
'리눅스' 카테고리의 다른 글
| Amarok Full Screen - Amarok (0) | 2008.11.20 |
|---|---|
| 하나의 물리적 NIC에 복수개의 인터페이스 설정하기 (0) | 2008.11.17 |
| vmware 마우스 휠 살리기 (0) | 2008.09.24 |
| Nemiver - gnome 환경에서의 gdb 디버거 (0) | 2008.09.01 |
| Xming 사용법 (0) | 2008.08.20 |
vmware 마우스 휠 살리기
Section "InputDevice"
Option "CorePointer"
Option "Device" "/dev/input/mice"
Option "Protocol" "ImPS/2"
Option "Button" "5"
Option "ZAxiaMapping" "4 5"
'리눅스' 카테고리의 다른 글
| 하나의 물리적 NIC에 복수개의 인터페이스 설정하기 (0) | 2008.11.17 |
|---|---|
| VirtualBox on Linux 에서 usbfs 인식시키기 (0) | 2008.11.17 |
| Nemiver - gnome 환경에서의 gdb 디버거 (0) | 2008.09.01 |
| Xming 사용법 (0) | 2008.08.20 |
| 삼바 옵션 - usershare (0) | 2008.08.06 |
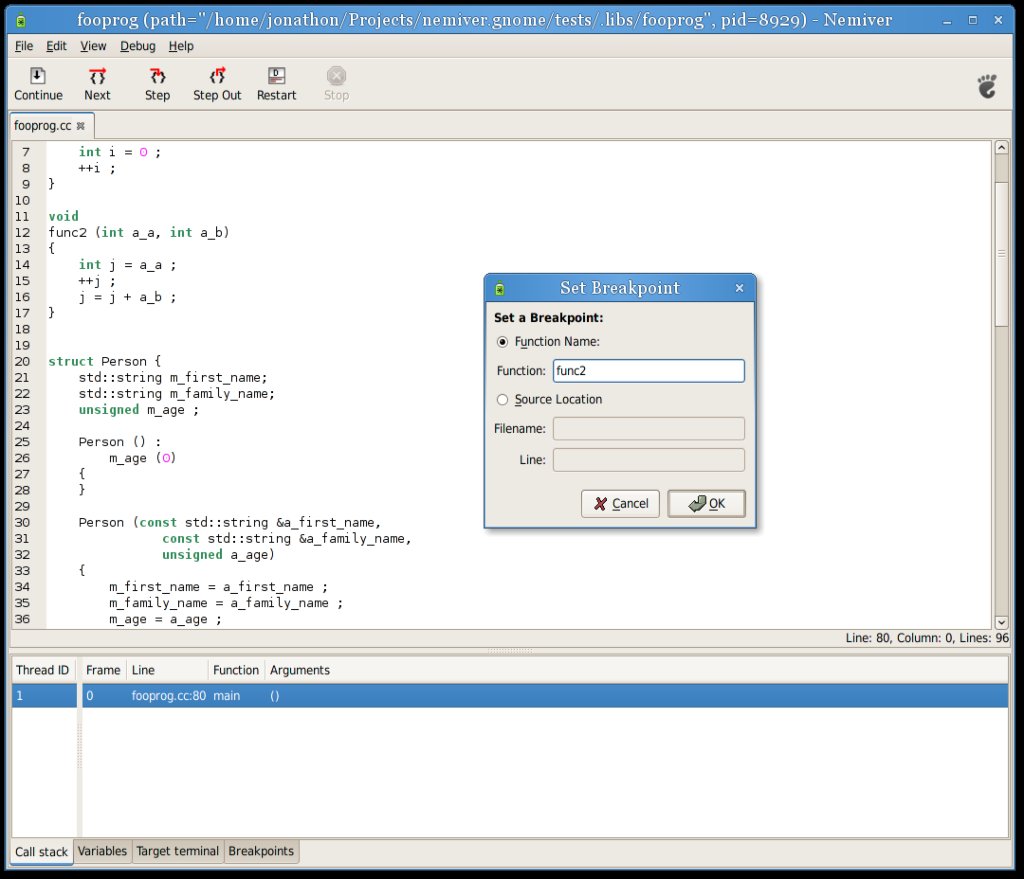
Nemiver - gnome 환경에서의 gdb 디버거
'리눅스' 카테고리의 다른 글
| VirtualBox on Linux 에서 usbfs 인식시키기 (0) | 2008.11.17 |
|---|---|
| vmware 마우스 휠 살리기 (0) | 2008.09.24 |
| Xming 사용법 (0) | 2008.08.20 |
| 삼바 옵션 - usershare (0) | 2008.08.06 |
| vmware-tools 모듈 컴파일 시 에러 생길 때 해결 법 - vmware on the windows(guest linux) (2) | 2008.08.04 |
- http://sourceforge.net/projects/xming를 방문하시고,
- Xming를 다운 받아 설치합니다.
- Xming-fonts를 다운받아 설치합니다.
- Xming 설치 후 Xlaunch을 실행시켜서 초기 설정을 해 준다.(기본설정으로 해도 된다.)
- ** xlaunch을 실행 시켜 논 상태에서 아래 작업을 해야 윈도우 화면에 x관련 프로그램을 띄울 수 있다.
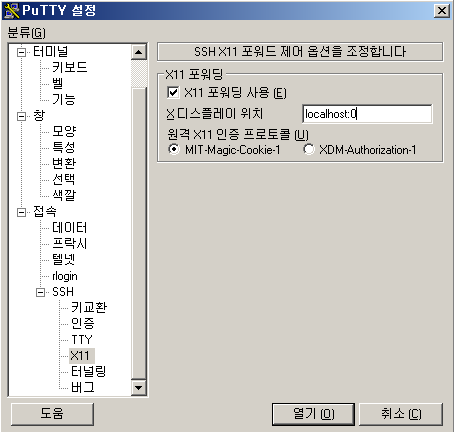
- 그 다음 putty을 설정해서 x-window 프로그램을 실행 시킬 수 있도록 한다.
- 설정은 아래 그림과 같이 터널링 옵션을 사용한다.
- 리눅스 시스템에 putty을 이용해서 접속한 다음 commandline에서 "gnome-terminal"을 실행 시켜보자 윈도우 화면에 뜨면 사용하는데 문제 없는 거다
'리눅스' 카테고리의 다른 글
| vmware 마우스 휠 살리기 (0) | 2008.09.24 |
|---|---|
| Nemiver - gnome 환경에서의 gdb 디버거 (0) | 2008.09.01 |
| 삼바 옵션 - usershare (0) | 2008.08.06 |
| vmware-tools 모듈 컴파일 시 에러 생길 때 해결 법 - vmware on the windows(guest linux) (2) | 2008.08.04 |
| Vim Tip (0) | 2008.03.28 |
삼바 옵션 - usershare
>> 해당 디렉토리 권한이 있는 사람만 공유할 수 있도록 설정 할 수 있다.
'리눅스' 카테고리의 다른 글
| Nemiver - gnome 환경에서의 gdb 디버거 (0) | 2008.09.01 |
|---|---|
| Xming 사용법 (0) | 2008.08.20 |
| vmware-tools 모듈 컴파일 시 에러 생길 때 해결 법 - vmware on the windows(guest linux) (2) | 2008.08.04 |
| Vim Tip (0) | 2008.03.28 |
| [ubuntu] VFAT 파티션 부팅과 동시에 마운트 하기 (0) | 2007.11.29 |
vmware-tools 모듈 컴파일 시 에러 생길 때 해결 법 - vmware on the windows(guest linux)
LINUX 2.6.24 AND VMWARE
Ubuntu
8.04 was recently released and continues its tradition of adding some
real polish to Linux. I’ve been consistently impressed with their goals
and progress - everything from improvements to Gnome and included applications to making Xorg “bulletproof” and seamless transition from Windows.
VMware Tools, whereart thou?
Unfortunately,
Linux 2.6.24 (which ships with Ubuntu 8.04 and will be shipping with
all other Linux distros shortly) moved some headers and symbols around,
and breaks VMware Tools. VMware has not been at all forthcoming
regarding updates to fix this, but fortunately their “open” offshoot
works well - there’s just no simple way to install the open tools. So we’re stuck with:
-
•No tools, which works decently. Many glitches seen in the betas have been resolved, and networking, video, etc all work fine out of the box, but things like shared folders and clipboard sync are out.
-
•Official tools that don’t compile, but could be installed trivially.
-
•Open tools that compile, but cannot be easily installed.
From the forums, I get the sense that this is not at all unusual on Linux, and is sorely disappointing.
This reminds me of the early days of Safari/WebKit, when one had to build WebKit from source and set up environment variables to use it. These days you can just click a link
and it downloads a nice wrapper application that does it all. No fuss,
no muss, and it allows anyone to easily use WebKit while waiting for
the official Safari builds to catch up.
A model to copy, VMware. Please take note!
In the meantime...
In the meantime there is a solution, courtesy of Mufassa
on the forums. He’s only posted once, but it’s a gem - in essence,
compile the open tools, and then package them up for installation by
the official tools install script. Works like a charm!
So, the basic steps are:
-
•Install any dependencies not shipped with a default Ubuntu install
-
•Get the official and open tools, and extract them
-
•Compile the open tools
-
•Rename and tar them as expected by the official tools
-
•Overwrite the official tools archives with the open ones
-
•Install them using the official tools install script
First, you’ll need to add several packages, either via Synaptic or apt-get:
-
•build-essential, libgtk2.0-dev, libproc-dev, libdumbnet-dev
-
•xorg-dev OR libX11-dev, libxinerama-dev, libxrandr-dev, libxtst-dev
A couple of these are new - according to this bug report,
libdumbnet and libproc were added as dependencies in the 2008-04-14
version of the tools, so other guides you see likely won’t list these.
Next, download and untar both the open tools and the official ones:
-
•Open VM Tools at SourceForge
-
•Offical Tools are included on an iso that can be mounted via the standard VMware GUI - when mounted you want the tar.gz, not the rpm.
-
•Move these somewhere convenient; I recommend the desktop.
-
•Use “tar -xvzf *.tar.gz” to expand.
Compile the open tools (if you have your dependencies straightened out, this should be fast and easy):
-
•cd open-vm-tools-*/
-
•./configure && make
Next, package up the compiled modules:
-
•cd modules/linux/
-
•for i in *; do mv ${i} ${i}-only; tar -cf ${i}.tar ${i}-only; done
-
•cd ../../../
-
•mv -f open-vm-tools-*/modules/linux/*.tar vmware-tools-distrib/lib/modules/source/
Finally, install the updated tools:
-
•cd vmware-tools-distrib
-
•./vmware-install.pl
A few notes:
-
•If you disabled Shared Folders in your VM settings, you’ll see a message “Mounting HGFS shares: failed”. Just enable shared folders and reboot.
-
•[Appears fixed on latest tools] Networking does not seem to properly configure itself when on the default “roaming” mode. I’m honestly not sure what is wrong here, but switching it to manual configuration with DHCP or static IP works fine.
-
•While this was all done on Ubuntu 8.04, I expect it will work fine in the future for new Linux versions and distributions.
Enjoy!
 invalid-file
open-vm-tools
'리눅스' 카테고리의 다른 글
| Xming 사용법 (0) | 2008.08.20 |
|---|---|
| 삼바 옵션 - usershare (0) | 2008.08.06 |
| Vim Tip (0) | 2008.03.28 |
| [ubuntu] VFAT 파티션 부팅과 동시에 마운트 하기 (0) | 2007.11.29 |
| [ubuntu] MS IntelliMouse 3.0 버튼 설정하기 (0) | 2007.11.29 |
-
현재 문자의 아스키 값 알아내기 - ga
- 명령행 모드에서 현재 커서가 위치한 문자의 아스키 값을 알고 싶으면
- ga을 입력하면 하단 상태바에 아스키 값이 나온다.
-
vim 콘솔 프로그램에서 메뉴 사용 하기
-
"tip 1045 : great wildmode/wildmenu and console mouse

set wildmenu

set wildmode=list:longest,full

set mouse=a


"console-menu

source $VIMRUNTIME/menu.vim

set wildmenu

set cpo-=<

set wcm=<C-Z>

map <F4> :emenu <C-Z> - 화면 아래쪽에 메뉴가 표시 되고 좌,우 화살표로 메뉴을 이동 할 수 있다.
-
이 글은 스프링노트에서 작성되었습니다.
'리눅스' 카테고리의 다른 글
| 삼바 옵션 - usershare (0) | 2008.08.06 |
|---|---|
| vmware-tools 모듈 컴파일 시 에러 생길 때 해결 법 - vmware on the windows(guest linux) (2) | 2008.08.04 |
| [ubuntu] VFAT 파티션 부팅과 동시에 마운트 하기 (0) | 2007.11.29 |
| [ubuntu] MS IntelliMouse 3.0 버튼 설정하기 (0) | 2007.11.29 |
| [ubuntu] vista로 만들어 보자 - 테마 (0) | 2007.11.29 |
[ubuntu] VFAT 파티션 부팅과 동시에 마운트 하기
우분투 설치하면 기본적으로 윈도우즈 파티션을 마운트 해 줍니다.
우분투 설치후, 저처럼 우분투 넘 좋타 윈도우즈 파티션 하나 날려서 리눅스/윈도우즈 같이 써야 겠다.
생각하시는 분들을 위해서, 물론 ntfs-3g를 이용 해서 ntfs를 쓸 수도 있지만은 아직까진 불안해서..
우분투에서는 uuid라는 것을 사용 하므로 자기가 마운트할 파티션의 uuid를 알아야 합니다.
| #vol_id /dev/sda2 하면 정보를 보여줍니다. #vol_id -u /dev/sda2 |
** 모든 사용자에게 접근 가능하게 하려면, umask=000 으로 설정해 주면 된다.
umask=007 마운트시 파일을 -rwxrwx--- 로 설정(소유자, 소유그룹 쓰기, 읽기, 실행<접근> 허용)
gid=46 gid는 소유 그룹인데 외장형장치 로 되있네요,
([시스템] >> [관리] >> [사용자와 그룹])에 사용자 정보에서 자동으로 외부 저장 장치에 접근이 허용 되 있는 유저는 다 사용 가능 할듯..
===============================================================================
140414 변경
===============================================================================
* ubuntu 13.10에서 작성
이제 vol_id 라는 유틸이 없어진 것 같다.
blkid을 사용하자.
그 외의 다른 부분은 다른게 없다.
'리눅스' 카테고리의 다른 글
| vmware-tools 모듈 컴파일 시 에러 생길 때 해결 법 - vmware on the windows(guest linux) (2) | 2008.08.04 |
|---|---|
| Vim Tip (0) | 2008.03.28 |
| [ubuntu] MS IntelliMouse 3.0 버튼 설정하기 (0) | 2007.11.29 |
| [ubuntu] vista로 만들어 보자 - 테마 (0) | 2007.11.29 |
| [펌] 시스템 관리용 오픈 소스 패키지 - Nagios (0) | 2007.11.26 |
[ubuntu] MS IntelliMouse 3.0 버튼 설정하기
Section "InputDevice"
Identifier "Configured Mouse"
Driver "mouse"
Option "CorePointer"
Option "Device" "/dev/input/mice"
Option "Protocol" "ExplorerPS/2"
Option "ZAxisMapping" "4 5"
Option "ButtonMapping" "1 2 3 6 7"
EndSection
수정 후 X-window 재시작하면 적용 된다.
'리눅스' 카테고리의 다른 글
| Vim Tip (0) | 2008.03.28 |
|---|---|
| [ubuntu] VFAT 파티션 부팅과 동시에 마운트 하기 (0) | 2007.11.29 |
| [ubuntu] vista로 만들어 보자 - 테마 (0) | 2007.11.29 |
| [펌] 시스템 관리용 오픈 소스 패키지 - Nagios (0) | 2007.11.26 |
| dyndns로 무료 도메인을 등록 해 보자 (0) | 2007.11.26 |


